Posts may contain affiliate links. Learn more in our Affiliate Link Policy.
Yesterday, it was revealed that Rise of the Dread Moon has shipped out to a lucky few people. We have reports now of copies arriving in the UK and France.
I’ve spent the last day and a half going through the notes, here’s my review, so far, of Rise of the Dread Moon.
I guess it goes without saying, this post will contain spoilers. I’ll be offering my thoughts on what we know of the story, the rest of the monsters, and several other elements of Rise of the Dread Moon. If you don’t want anything spoiled, you better just bookmark this page and come back after you’ve played the expansion.
One lucky Redditor, vincezo1985, has posted a large number of images revealing the hidden details to us. Here are the Reddit feeds that contain this vast wealth of knowledge:
Skip the Reddit posts and see the rest of the story below.
Quick Links
If this is your first time hearing about Rise of the Dread Moon, this is an expansion for the HeroQuest Game System and requires the game system to play.
New Monster’s & Abilities Explained
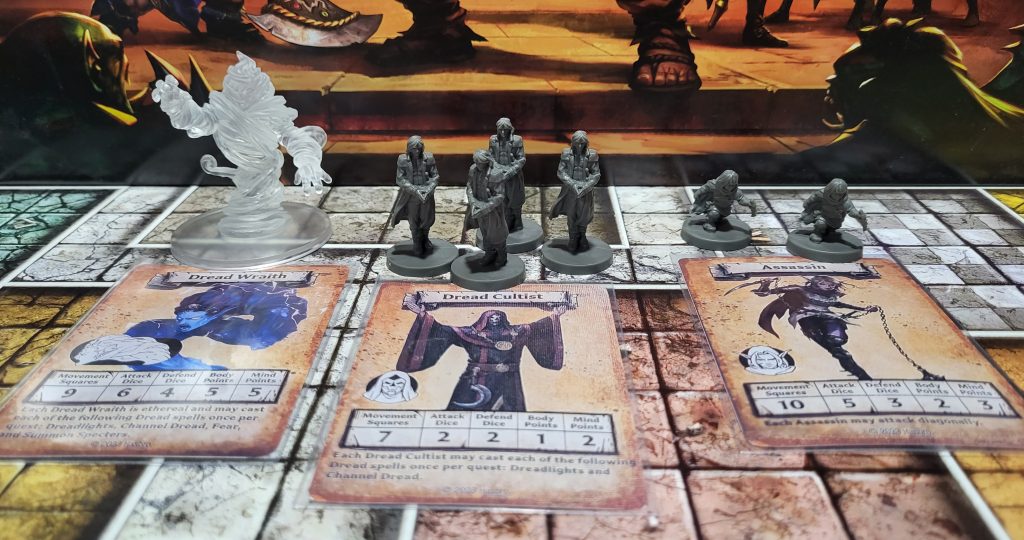
Specter
Back when the Specter was first revealed, all we knew about ethereal was it meant these monsters could pass through solid objects. This has been expanded to also include a resistance to damage. When attacking an ethereal monster, a hero must roll a black shield instead of a skull!
In my initial playtest with the Specter, I concluded that they didn’t seem like as much of a threat as we initially thought. I think I was wrong. I’m going to get into some more playtesting later, but this new piece of information is a bit of a game changer I think.
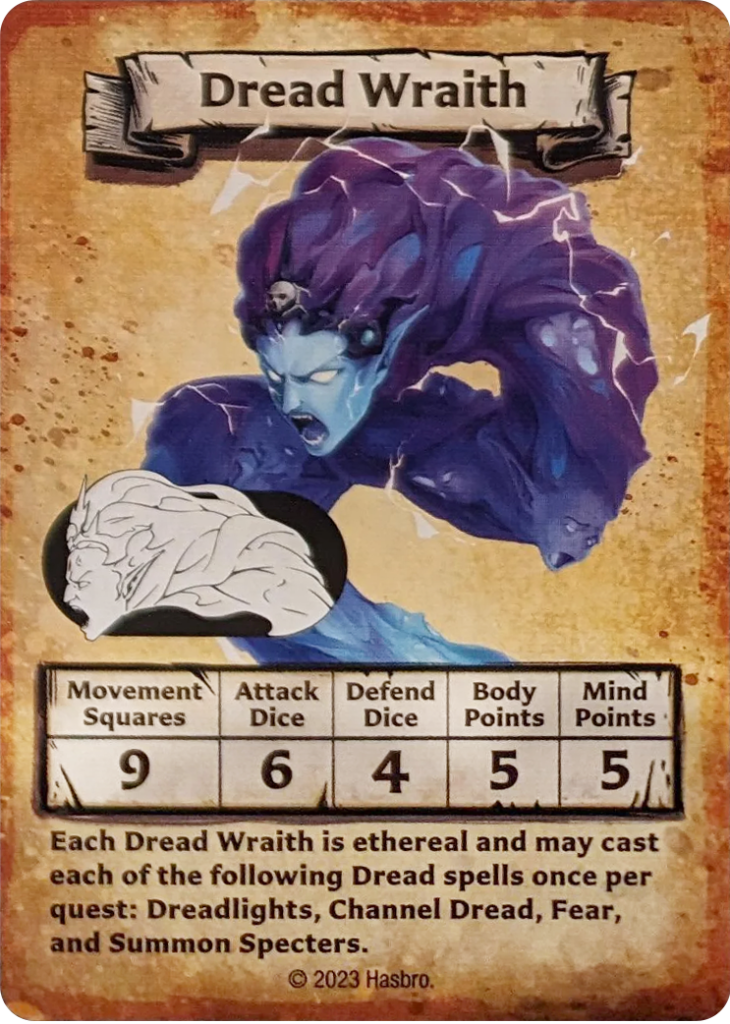
Dread Wraith
Also an ethereal monster, and one that isn’t what we thought. Common belief was that the Dread Wraith would show up as a boss character, it looks more likely to just be a really powerful entity in Zargon’s ranks.
The Dread Wraith has a staggering stat block with: 6 attack dice, 4 defend dice, 5 body and 5 mind points. On top of that deadly mess is the ability to cast a multitude of spells: Dreadlights, Channel Dread, Fear, and Summon Specters which allows it to bring up to 3 Specters against the Heroes.
This is truly a force to be reckoned with. It will be interesting to see how the Heroes fare against this entity in the playtesting portion.
Dread Cultist
Physically, this enemy is slightly less powerful than your standard Orc, with 2 attack dice instead of 3 and 7 movement instead of 8.
The Dread Cultist relies on spells to supplement its abilities, specifically Dreadlights, and Channel Dread. Remember that with Channel Dread works best with other monsters who can also cast Channel Dread. This means I think it will be common to see large groups of Cultists, and have them paired up with Dread Wraiths and Specters.
Assassin
The Assassin’s are quite deadly as well. They tie the Goblin for the fastest monster and have 5 attack dice and 3 defend dice.
What makes the Assassin unique though, is its special ability to attack diagonally. This could be a disaster for a Wizard hiding in a corner with only 2 companions standing between them and death.
Some of us were hoping for some range with this enemy, but I almost think this is better. We already have the archer to give us range, the Assassin fills in the gap for the close range and diagonals.
A Message from Mentor – The Story
As with every quest book, we start off with a message from Mentor. We are told that not everything is as it seems in the Elven kingdom of Elethorn. From the outside, all would seem well. The Princess has been saved, there are festivities going on in celebration of this. It would seem that the conflict has ended.
Beneath the surface, evil machinations are travel and communications within the kingdom have been disrupted and a group of Guardian Knights investigating Zargon’s agents has gone missing. Furthermore, an astrological event, called the Night of the Dread Moon is close at hand. This event that occurs once every 1000 years strengthens the power of Dread Magic.
With the princess saved, Queen Terrellia may not take kindly to more meddling in Elven affairs. It would seem that the Heroes are unwelcome in Elethorn and must now infiltrate the kingdom to investigate the spread of Dread.
This quest pack has a very different and unique feel to it. The impression I get from reading the opening note from Mentor, as well as the new mechanics introduced make this quest feel less like a dungeon crawl and more of an infiltration mission, working with the underground resistance in Elethorn.
This expansion includes a large open air tile called the Plaza, where disguised Heroes can move around enemies, undetected. The pack also includes several NPC’s that can be interacted with. I see this as delving through the corridors of a dungeon and more like sneaking through the narrow streets of an Elven city. The rooms you enter may be perceived as separate buildings instead of rooms in a dungeon. I’m really intrigued by this idea, and can’t wait to see it play out.
New Game Mechanics
Disguises, Plaza & Hideouts
A Hero is considered disguised if they have a Disguise token. The Hero must decide at the beginning of the quest to take a Disguise token, though disguises may not be available in every quest. In order for a Hero to maintain their Disguise, they must follow certain rules:
- The Hero may not use armour other than Bracers or a Helmet
- The Hero may not attack with any weapons, other than: unarmed, Dagger, Shortsword, Handaxe, or Staff
- The Hero may not cast spells (does this include other hero abilities as well?)
As long as the Hero follows the rules they may remain disguised.
From what I can tell in the rules, the only place Disguise helps is when you enter a Plaza. In the Plaza tile, monsters are inactive (will not attack or move) unless an undisguised Hero enters their line of sight, or they are attacked. It might be a hard decision whether you want to be disguised. It could be a long time through the quest before you get to a Plaza. Now, take this with a grain of sand; we haven’t seen any of the quest notes. It’s possible there are other places where a Disguise is useful.
On the topic of the Plaza, I want to also talk about the Hideout. This is a tile that acts as a safe haven for the Heroes. While in a hideout, the Heroes may recover some Body/Mind Points. They can also use the Alchemist’s Bench to craft potions from ingredients.
The Quest Book states that “Heroes do not have routine access to shops”. This implies that instead of shopping between quests, the Heroes must wait until they enter a Hideout to shop.
How does this relate to the Plaza you light ask? Well, I haven’t seen both the Plaza and the Hideout tiles in the same picture, this leads me to believe that the Hideout and Plaza tile are on opposite sides of the same tile. Any give quest can contain either a Hideout or a Plaza, but not both. This means, the Heroes won’t know whether they can Disguise or Shop in any one quest.
Shopping will also be limited. Heroes may only purchase items that are offered in the Underground Market. The way this is worded also implies that the items available will change depending on the quest. This is an interesting and refreshing mechanic that some of us have homebrewed in the form of a travelling merchant.
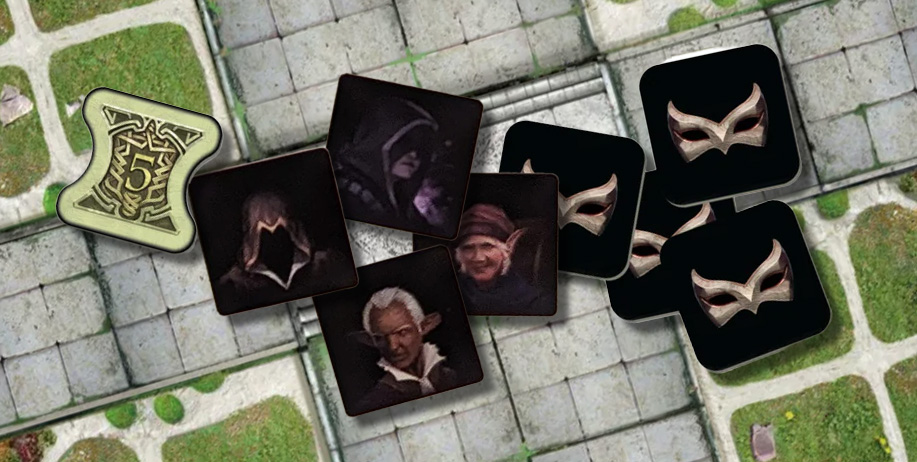
Speaking of a travelling merchant, we have Strangers. It’s possible that one of these Stranger tokens could be used as a merchant for the Underground Market in a Hideout. Strangers are described as “people who are not clearly friend or foe…”, this could mean anything. We’ll have to wait and see how this is used in the quests.
Mercenaries & Reputation
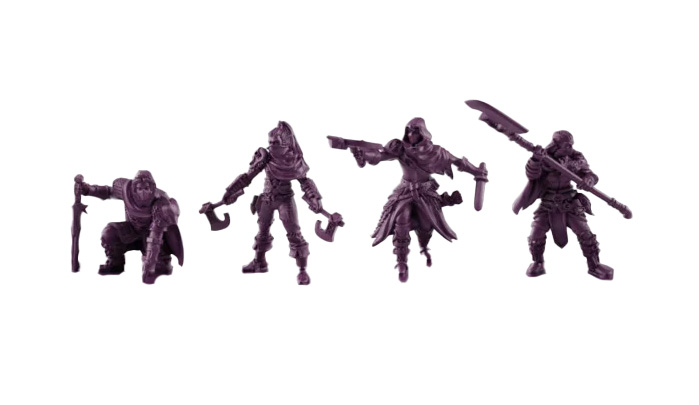
The Mercenaries in this Quest Pack work a little differently than what we are used to. They are not immediately available to purchase. The Mercenaries must be unlocked at various points in the quest book. In previous Quest Packs, we could hire Mercenaries right from the start.
There’s not much special about the Mercenaries in this Quest Pack. They have identical stats as their previous counterparts. The key difference here is that we are only allowed to hire one of each type per quest.
For comparison; the Scout = The Scout (from Frozen Horror), the Arbalist = The Crossbowman, the Glaive = The Halberdier, and the Striker = The Swordsman.
Also of note, the Mercenaries in Rise of the Dread Moon are considered to always be Disguised, even when using improper Disguise armour and equipment. And finally, any Mercenaries that were purchased with Reputation do not need to be rehired for future quests, as long as they survived through the previous one.
How does one gain Reputation? Reputation is gain as a group, and can be spent as a group. Reputation should be gained 1 for each quest completed.
One thing I find particularly interesting about the Mercenaries is the fact that the Cadre of the Raven’s Veil isn’t mentioned in the rules portion of the Quest Book, nor is it a part of the story at the beginning, during Mentor’s message. Hopefully the Cadre becomes a bigger part of the story during the quests.
Alchemy & Potions
As we know, crafting materials will be available to create potions. How will this work and how to our Heroes collect these materials.
The ingredients themselves appear to be part of the treasure cards. When searching for treasure, a Hero may be able to find reagent ingredients.
The action of Crafting itself, is specifically a Wizard action, though it is possible for other Heroes to craft by using a Reagent Kit. I like this new mechanic, if gives the Wizard a new unique ability, similar to the Dwarfs innate ability to disarm traps without a Trap Kit.
Crafting can only happen at specific times. In between quests, or in the presence of an Alchemist’s Bench. This is interesting, now furniture finally has a purpose other than just sitting there, looking pretty. Don’t get me wrong, it still looks pretty, but it’s nice to have some interaction now.
But wait, there is more interaction with furniture introduced. The Sorcerer’s table also has a purpose now. During the quest, Heroes will have the opportunity to collect Lunar Charms. If a Hero searches a room with a Sorcerer table for treasure, they may also restore 1 Body and Mind Point if they are holding a Lunar Charm. The Elf does not require a Lunar Charm to gain this effect from a Sorcerer table.
So I guess that just leaves the Barbarian without any innate ability. Does he really need one though? LOOK AT THE MUSCULARITY!
Playtesting New Minions
Alright, I’m sorry you had to sit through all that, now for the part I’m most excited about. How do the Heroes stand up to the new enemies! As I don’t have my copy of the game yet, I’ll be using some stand-ins for the monsters.
As with the previous reveal, I’m going to do a little bit of playtesting with these new enemies.
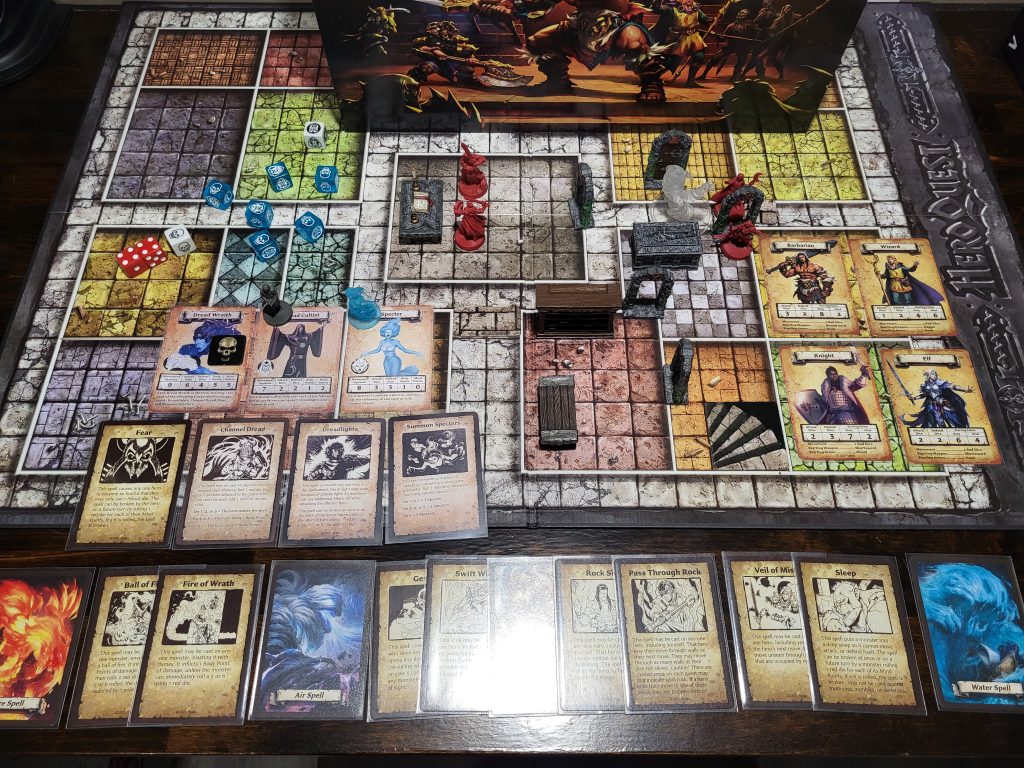
For the Dread Wraith, I’ve got an Air Elemental. The actual mini appears to take up 2 spaces, I’ll try to emulate this as best as possible, my Air Elemental takes up 4 spaces, similar to The Frozen Horror. The Dread Cultist will be subbed in for my Crimson Courtiers from Altar Quest. For the Assassin, I’ll be using the Cutpurse, also from Altar Quest.
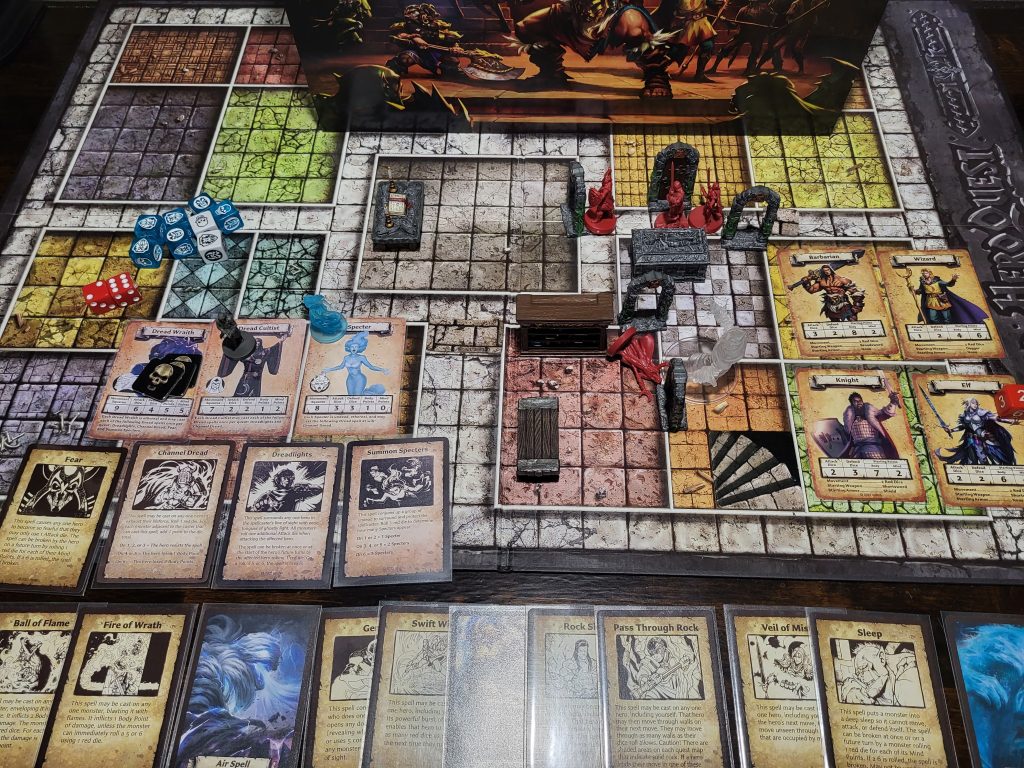
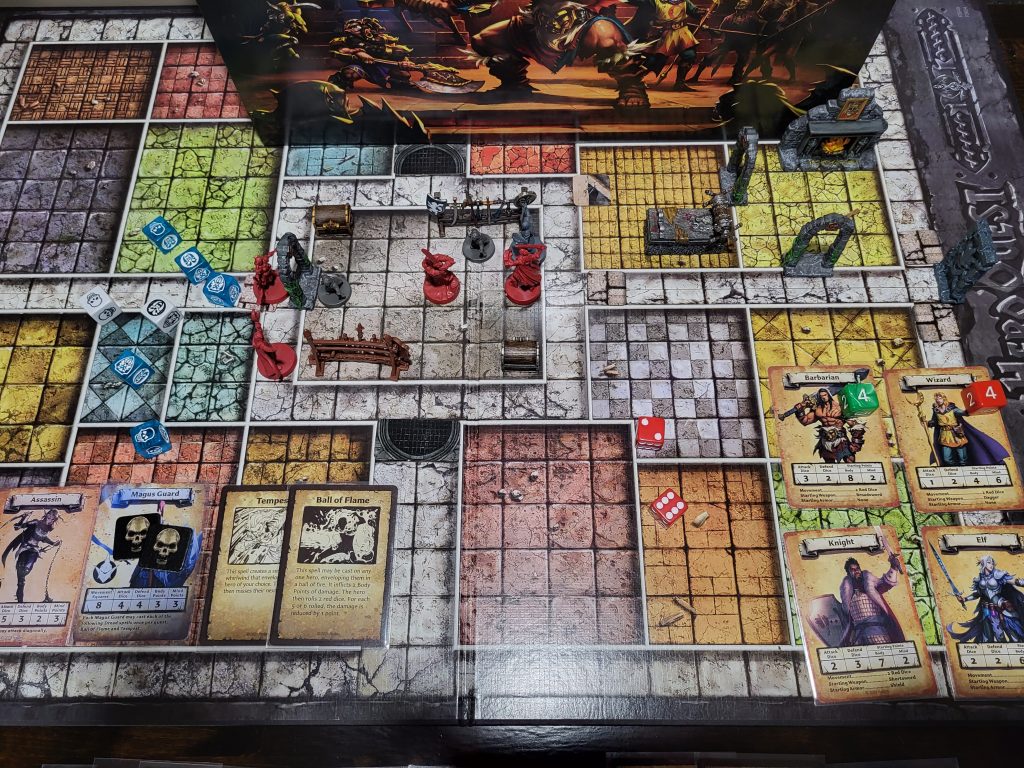
Playtest #1: Dread Wraith, Cultist, & Specters
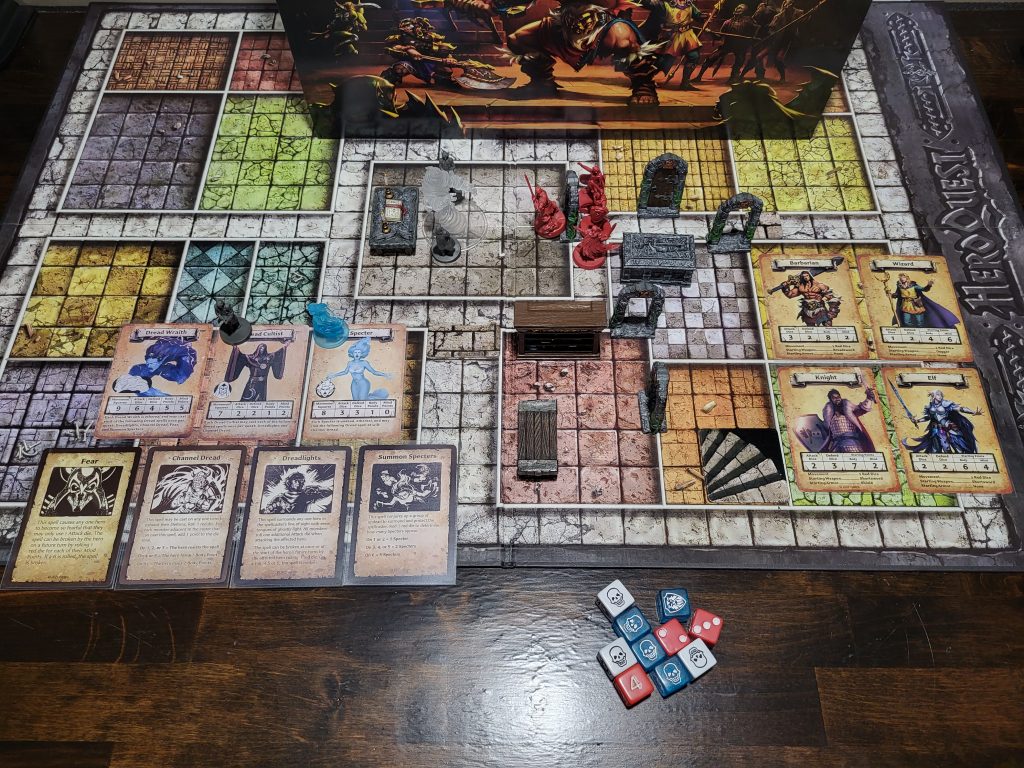
Here, our group has interrupted some kind of Dread ritual, we have some Dread Cultists at a sorcerer table conjuring a Dread Wraith, I’m assuming that’s how the Wraiths will get into this plane of existence.
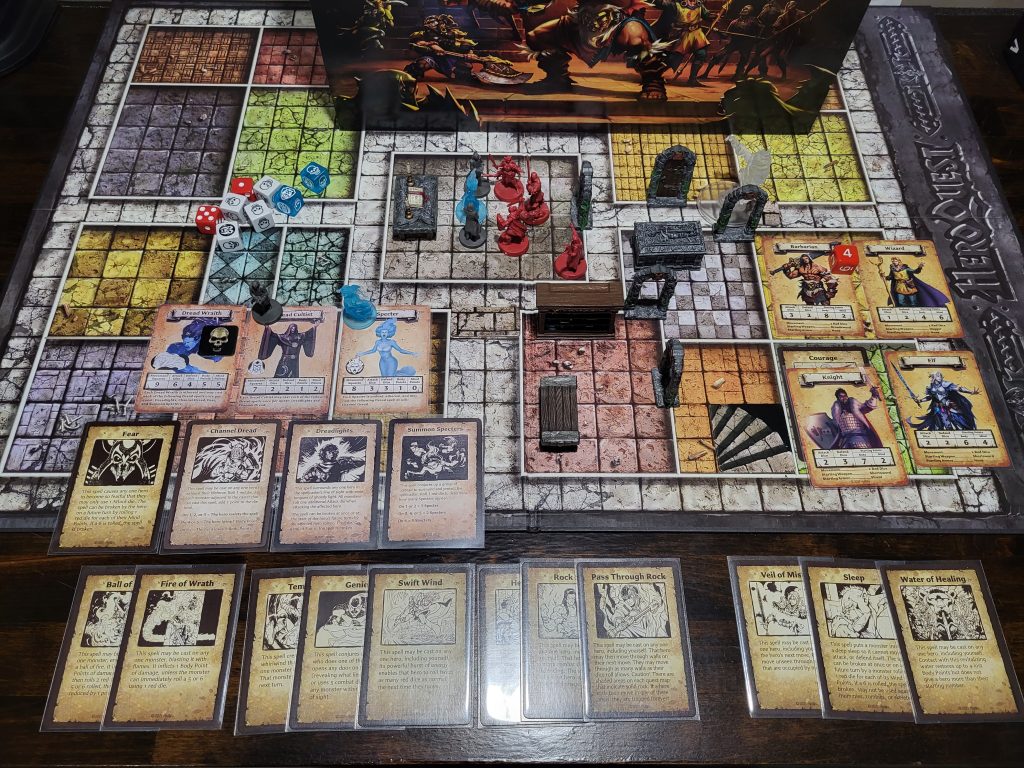
Round 1:
The Barbarian rushes forward to meet the Wraith. He rolls a respectable 2 Black Shields (required for hitting ethereal monsters. Unfortunately, the Wraith rolls 3 Black Shields and blocks all damage. The Guardian Knight also rushes forward attacking the Wraith. One Black Shield strike gets through. I can tell this is going to be a difficult encounter. The Elf will also attack the Wraith but misses. The Wizard, seeing his companions struggle against the Wraith casts Courage on the Barbarian.
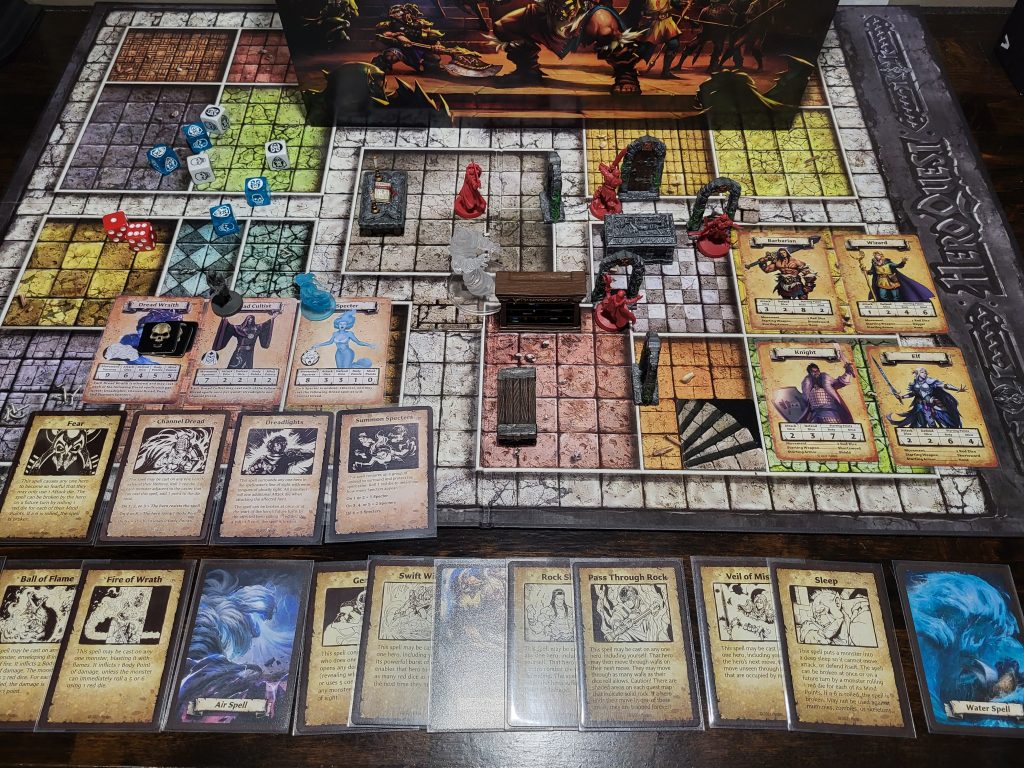
The Wraith screeches and casts Summon Specters bringing 1 new monster into the battle. The Spell effect doesn’t say where to place the Specter, so I’ll place it as close to the Wraith as possible. The Wraith then retreats THROUGH the Heroes, maintaining line of sight. The new Specter moves into position, where the Wraith was between the Cultists and casts Channel Dread at the Barbarian. The two adjacent Cultists also know this spell, so that adds 2 to the result of 6, totaling 8. The Barbarian takes 2 damage. Each Cultists also casts Channel Dread at the Barbarian, with +1 each. The first rolled a 1, but the second rolled 5. With the +1, the Barbarian takes another 2 damage. The Cultists have exhausted their Channel Dread spells though. Thinking that they can bolster the Specter’s Dread, the Cultists choose to remain at its side.
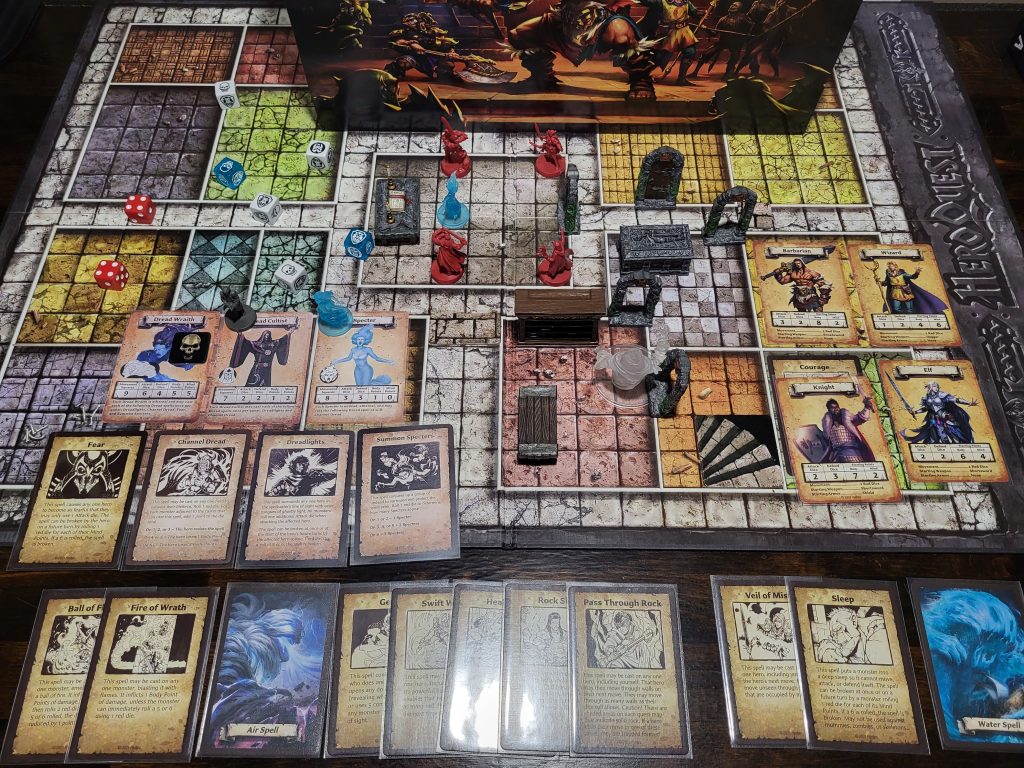
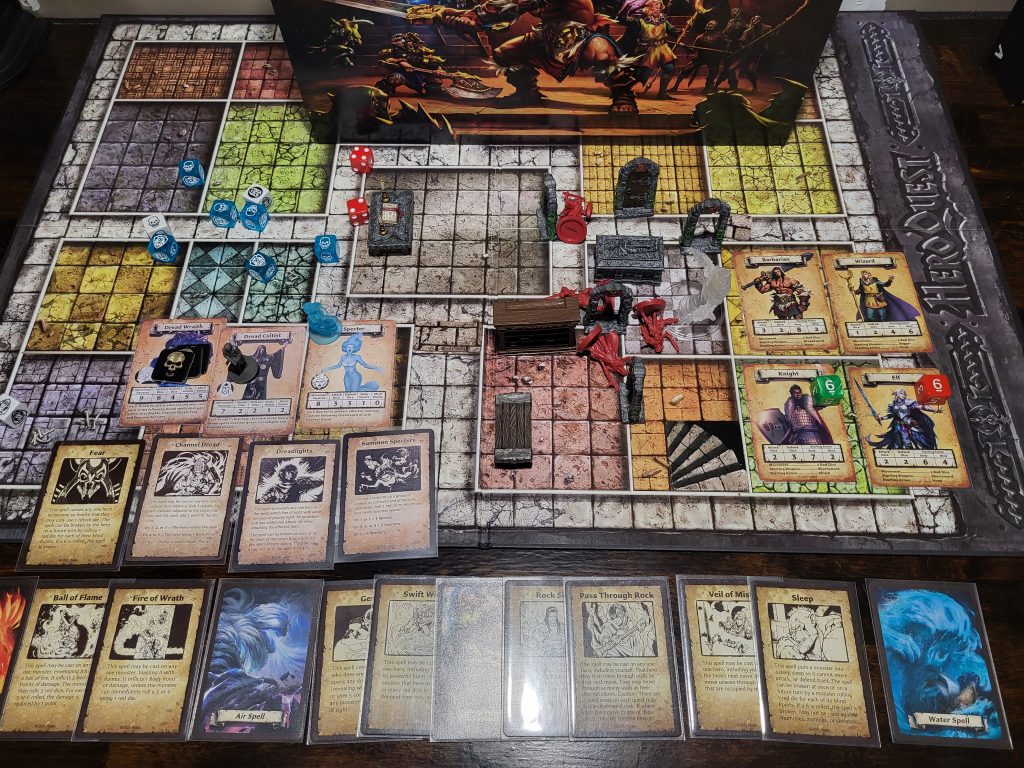
Round 2:
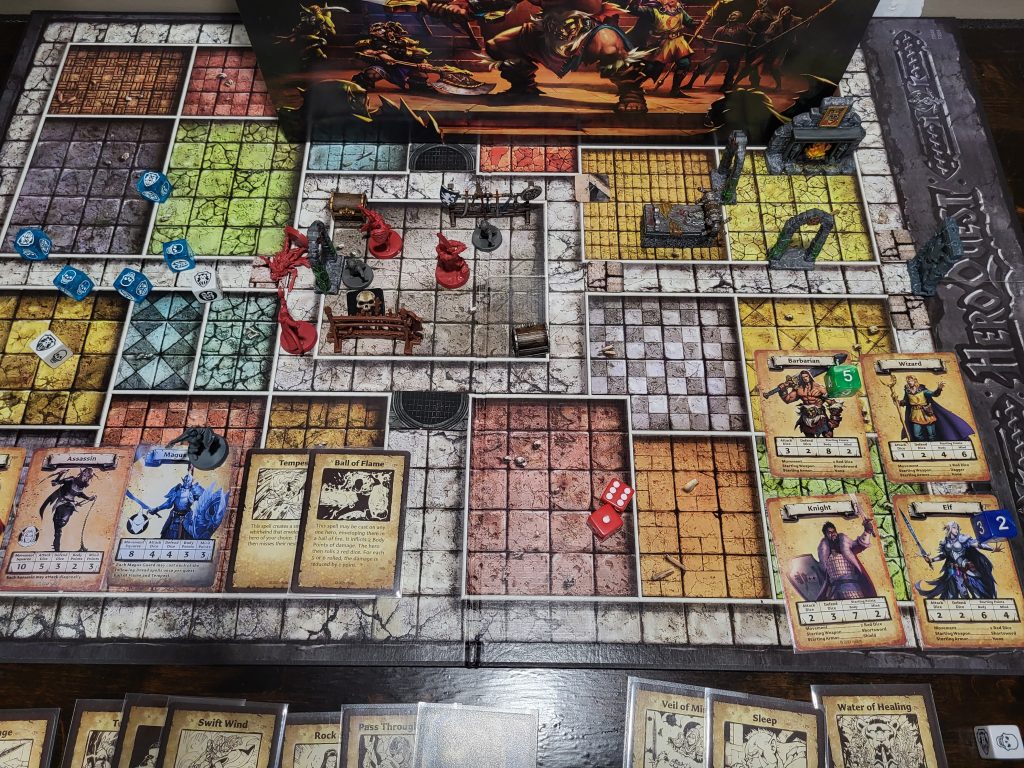
Reeling from the attack and seeing the Cultists channeling their dread into the Specter, the Barbarian moves to attack one cultists. Fortunately, he scored a single hit, just enough to take the Cultists out of play. Now with 4 Attack Dice, the Guardian Knight moves to attack the second Cultist, also landing a blow. The Specter is now stands alone. Seeing the Barbarian in pain, the Elf moves out of line of sight of the Wraith and use Water of Healing to restore her friend’s 4 lost Body Points. The Wizard then casts Tempest on the Specter, causing it to miss it’s next turn.
No longer able to see the Heroes, the Wraith further retreats, biding it’s time, waiting for the Heroes to come to it.
Round 3:
The Barbarian and Guardian Knight both attack the Specter, only one is able to land a hit though. As soon as the Specter dissolves away, the Guardian Knight loses his Courage. The Elf and Wizard begin pursuit of the Wraith.
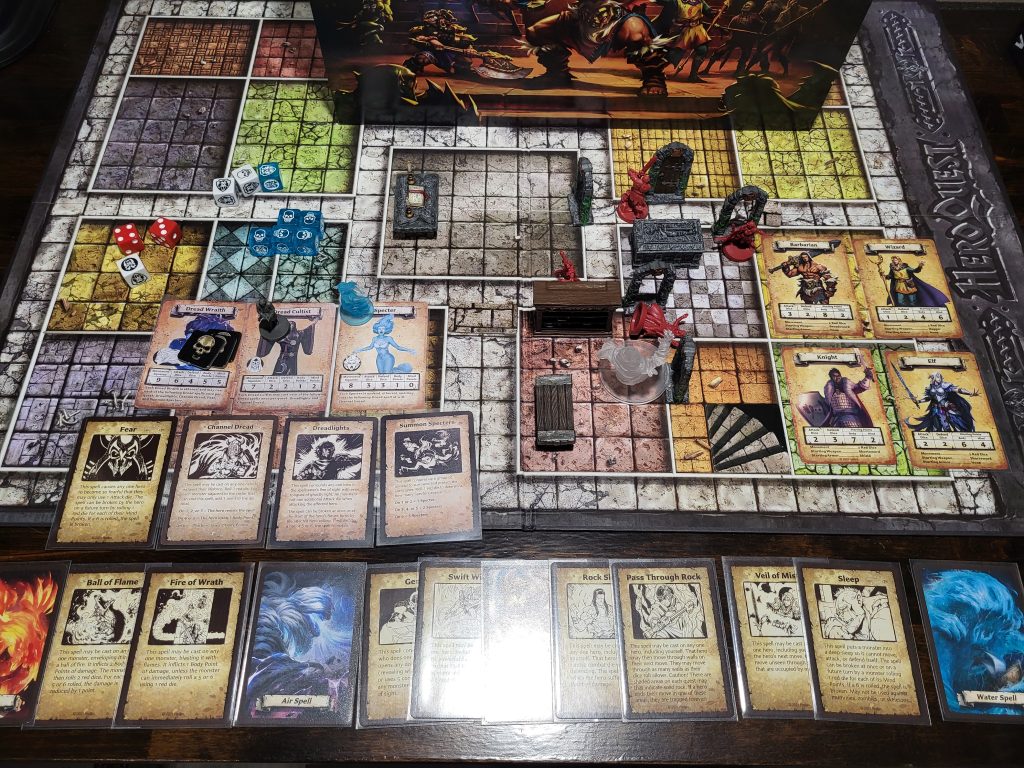
With the Heroes close behind, the Wraith passes through a wall to flank the Wizard on the rear, attacking, the Wraith deals 4 hits to the Wizard, putting him out of commission. Besides moving, the Wizard did not take an action on his turn. In a last desperate act, he utters the words for Heal Body and narrowly escapes death!
Round 4:
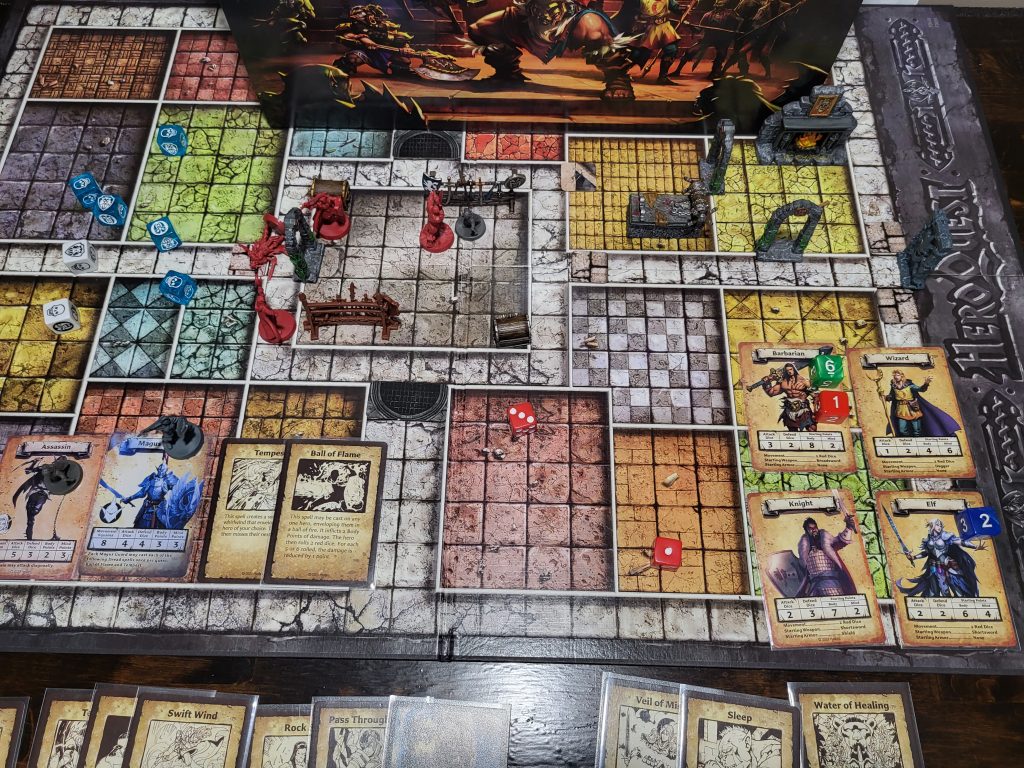
The party, seeing their Wizard nearly die, launches a full scale assault on the Wraith. The Barbarian Manages one hit, his two Black Shields only blocked by the Wraith’s one Black Shield. The Wizard launches a Ball of Flame, point blank at the Wraith, inflicting 1 damage, then retreats past the Elf. The Wraith is now down to 2 remaining Body Points.
The Wraith, seeing the Barbarian as it’s biggest threat, casts Fear on him then floats past him and through the corridor.
Round 5:
The Barbarian, is still too frozen with Fear to move or attack, he stays where he his, believing himself to be relatively safe at the moment. The Guardian Knight is just able to get into range of the Wraith, but is unable to hit it. Knowing that the Wraith could pop up anywhere, the rest of the party decides to stay dispersed and see where it will appear.
Thinking that the Wizard is an easy target, the Wraith glides through the bookcase and engages the Wizard. Once again the Wizard is down! This time, with no healing spells left, he breathes his last breath.
Round 6:
The Barbarian is still in the grips of Fear, especially after seeing his friend die. Rage is starting to creep in, but he can’t move enough to engage the Wraith.
The Wraith then attacks the Elf, dealing 2 damage to her.
Round 7:
Finally Fear has left the Barbarian and is now replaced with Rage. The Barbarian attacks with a powerful blow of 3 Skulls. This would have been great, had it not passed right through the Wraith, narrowly missing the Elf. The Guardian Knight and the Elf both attempt to hit the Wraith, but with no effect.
The Wraith again attacks the Elf. Somehow the Elf manages to defend. The Wraith then moves away.

Round 8:
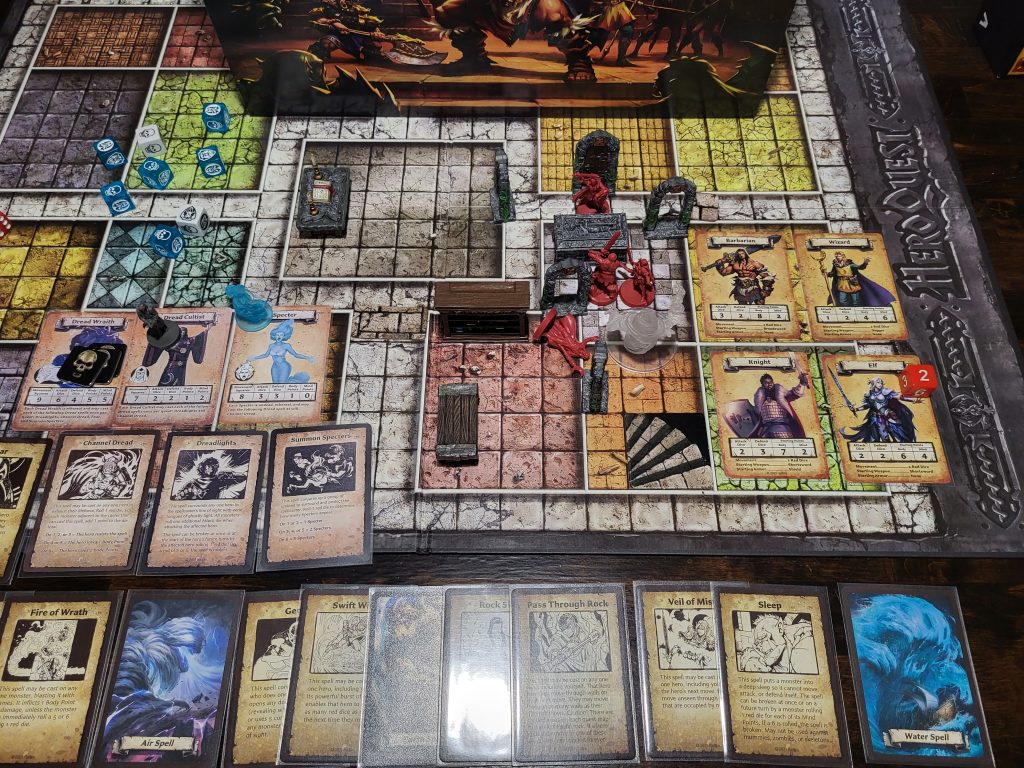
Frustrated, the Heroes have no choice but to follow the Wraith. The Wraith casts Dreadlights on the Guardian Knight, then flees again.
This tactic of hitting and running went on for 5 more rounds. Ultimately, the Barbarian died on round 10, the Guardian Knight died on round 12, and the Elf finally fell on round 13.
The Wraith might be a bit broken. There are no restrictions for it. It can attack, then pass right through Heroes and then into other rooms forcing the Heroes to give chase. Especially when moving to other rooms, the Heroes can’t catch up in one turn and suffer hit after hit. On top of this freedom to go wherever it wants, the Wraith is incredibly hard to hit, My Heroes were only able to take down 3 of it’s 5 body points, and only two of them were from direct hits, one Body Point came from the Ball of Flame spell.
Overall, This is a very difficult monster to beat, and it gives Zargon a lot of power to troll the Heroes by hitting, then escaping just out of reach. I’ll be honest, that encounter was a bit exhausting.
If you missed my other Rise of the Dread Moon playtests, check them out here: Specter | Magus Guard.
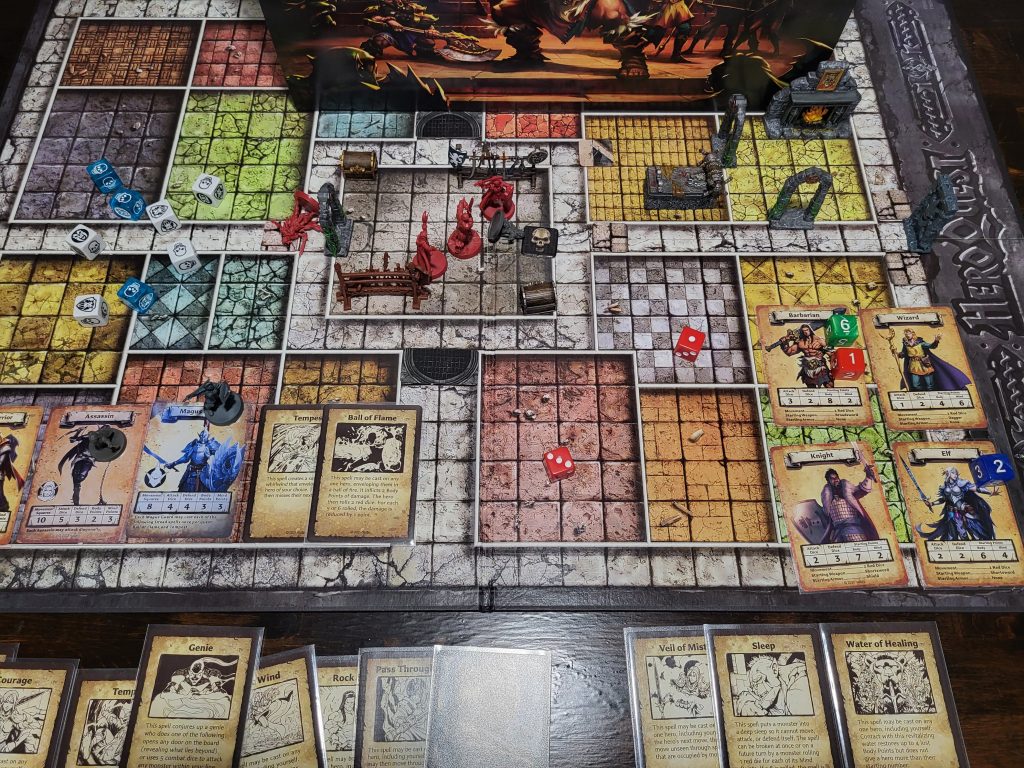
Playtest #2: Assassin, Elven Warrior, and Magus Guard
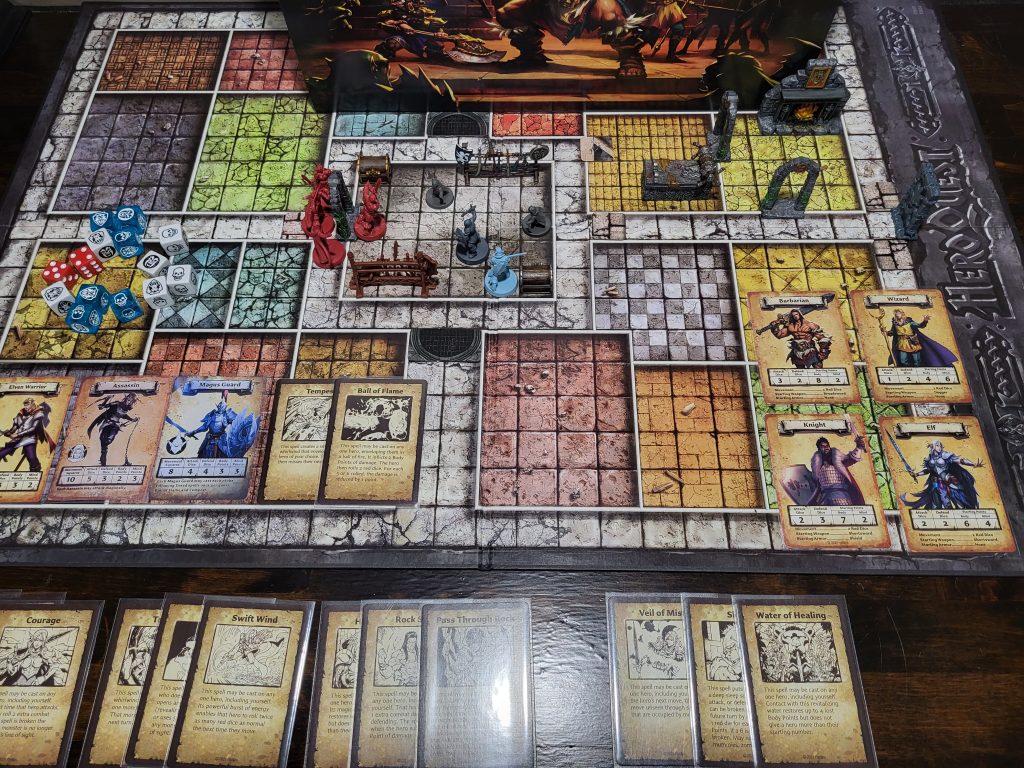
In this quest we have a group of Heroes infiltrating a hidden Elven Armoury in the sewers beneath Elethorn.
Round 1:
The Barbarian stumbles into the room and finds a Magus Guard, two Assassin’s, and an Elven Warrior stocking up on supplies.
The Barbarian immediately engages the Magus Guard and manages to get 2 hits on them. The Guardian Knight also engages the Magus Guard, but misses. The Elf decides to stay where she is to protect the Wizard, she casts Sleep on the Assassin closest to her. The Wizard, following the Elf’s instructions to stay put, doesn’t move.
The Assassin immediately breaks the sleep spell and moves to the doorway. It attacks and hits the Wizard for 4 Body Points. The Wizard barely has a chance to cast Heal Body, regaining his lifeforce, looks to the Elf exclaiming “They can attack diagonally!”
The wounded Magus Guard fires a Ball of Flame at the Barbarian, who suffers 1 burn, then retreats. The Elven Warrior moves to engage the Barbarian and hits for 3 points of damage. The Barbarian is not having a good day! The second Assassin moves also to attack the Barbarian but misses.
Round 2:
In a flurry of rage, the Barbarian wildly attacks the Elven Warrior, killing it in a single hit. While the Barbarian is busy, the Guardian Knight attacks the Magus Guard but is blocked. The Elf attacks the Assassin who nearly killed her friend, but also is blocked. Now this one is funny. The Wizard fires off a Ball of Flame at the Assassin, but it wizzes past her head dealing no damage. What makes it funny is my quick notes from testing: “wiz shoots ass with fireball…”. I’d like to think I did that on purpose, but I didn’t notice it until writing this! The Wizard then moves just out of range of the Assassin.
The Heroes have been having a lot of trouble this round.
The Assasin near the Elf takes a swing and hits the Elf for 2 Body Points. The Magus Guard moves to the other end of the room and casts Tempest on the Barbarian. As a swirling vortex engulfs the Barbarian, the other Assassin takes a chance to hit the Barbarian for 1 Body Point.
Round 3:
After a particularly difficult round, the Guardian Knight jumps on for the kill. Attacking and defeating the Magus Guard who incapacitated his friend the Barbarian. The Elf then steps in with an attack dealing 1 bp of damage to the Assassin near her.
The Assassin brutally retaliates, dealing 4 Body Points of damage to the Elf, killing her right in front of the Wizard! Since the Elf took an action to attack on her turn, she doesn’t have an action free to cast Water of Healing on herself. The second Assassin hits the Barbarian, sending him down to 3 Body Points remaining.
Round 4:
The Barbarian and Guardian Knight both attack the Assassins near their respective positions, only the Guardian Knights blade meets its mark. This is just enough to put an end to the Assassin who took down the Elf. Upset about his friend, the Wizard is frozen in place.
The Assassin, seeing it’s chance, swings at the Barbarian, nearly taking him out. The Barbarian is left with 1 remaining Body Point.
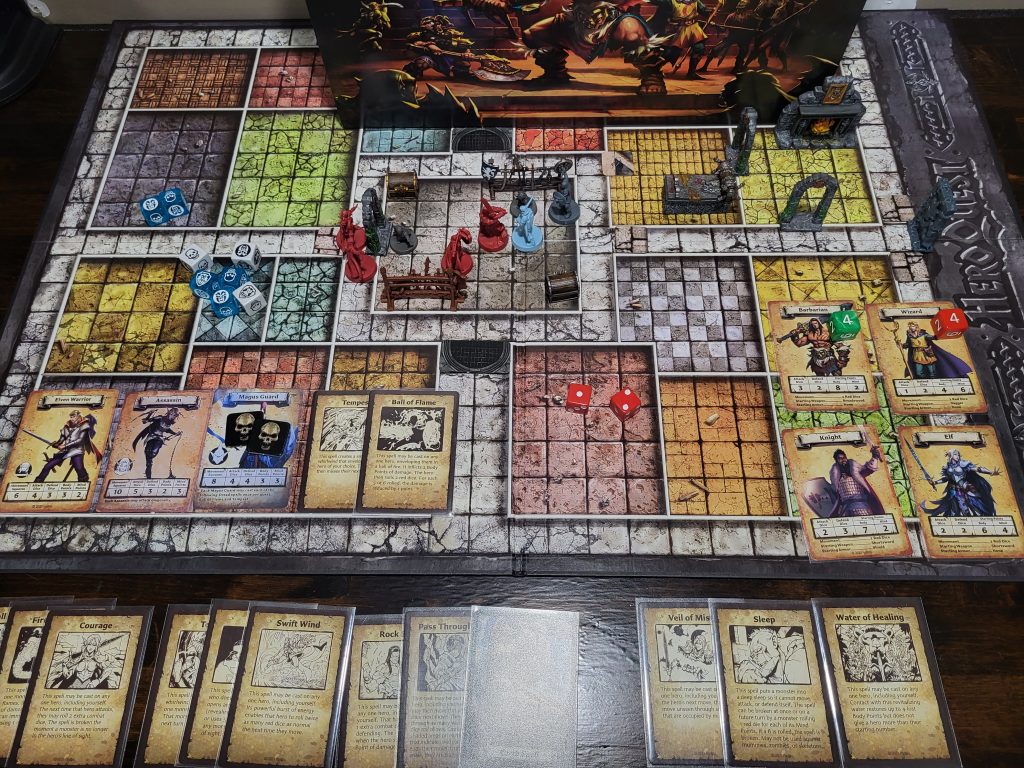
Round 5:
The final Assassin stands, staring down the Barbarian and the Guardian Knight. The Barbarian lunges forward, but the blow glances off the Assassins blade. The Guardian Knight leaps forward, blade connecting, but not enough to fatally wound the Assassin. The Wizard, come out of his daze, a vengeful cry from his lips, unleashes a Genie at the Assassin. The Genie tears through its target, leaving nothing behind.
The party comes out victorious, but at what cost.
That encounter seemed fairly typical. It went a lot better than the Wraith battle. The Assassin is quite the formidable foe, but against seasoned Heroes, shouldn’t be too much of a problem.
You have to remember that I’m going at this with a brand new party. If your group comes into Rise of the Dread Moon, with at least the Game System under their belts, they may even be able to take on the Wraith with a better result than I got.
Final Thoughts
So far, I really like what I’ve seen from this expansion. Avalon Hill seems to have delivered a really decent product with an interesting story.
The added game mechanics are just complex enough to add something interesting to the game, but without making destroying the main thing that makes HeroQuest stand out from most other games, it’s simplicity.
I want to thank the Avalon Hill team for their hard work and dedication to the fans and the franchise. Keep up the great work! We are really looking forward to what the future holds for HeroQuest!
I hope you enjoyed my ramblings about this new HeroQuest Expansion. Let me know your thoughts on this newest HeroQuest expansion in the comments.
Thanks for stopping by, hope to see you again soon!
Hi! Would like to know where you got that Air Elemental. I been looking for any Elemental miniatures for Heroquest.
Hey there! Thanks for reaching out. That specific Air Elemental is from a Kickstarter project called Fantasy Series 1 by Blacklist Games. The campaign had some fulfillment issues and has caused some problems for the company, as such, I’m not sure if they are actively selling them or not. Do some searching around online, you might find someone selling them for a reasonable price. Looks like Amazon has some of them available, but they appear to be pretty pricy: https://amzn.to/3AmU7aR (This is an affiliate link, if you would prefer not it use it, the same Amazon listing can be found through a Google search).
These new monsters are going to make the game much more fun for me!
Missed this rundown for some reason! Great job, as always, with the play test. Still found this useful even though my pack came in. Please post about the wandering monk or the leaked expansions list. Love to hear your thoughts!
Ive just picked up ROTDM
Looking at the treasure & alchemy cards there seems to be a problem
Their are 3 types of treasure cards which can be “crafted” one which crafts a random potion which isn’t an issue.
However the others craft specific potions
Mysterious flower which crafts a potion of dexterity or a potion of defense
Their is a potion of defense which has the “crafted” keyword but no potion of dexterity with the “crafted” keyword.
And
The treasure card sacred plant you can craft holy water or potion of restoration their is no holy water card or potion of restoration with the “crafted” keyword.
Their is among the pay for alchemy cards a potion of restoration & dexterity.
Their are 7 alchemy cards “crafted” keyword but only 1 which can be crafted.
Regarding the wraith
Rather than chasing the wraith let the wraith come to you forcing the wraith to move & take an action rather than the other way round.
Or you can continue the quest keeping as much distance as possible again forcing the wraith to move & take an action rather than the other way round.
Also if the wraith can move through heroes also hero’s can move through the wraith?
Not broken just tricky.